Pruning & Training Fruit Trees
Essentially there are three stages to pruning:
- Early hard pruning to develop the shape of the tree
- Lighter pruning to encourage fruiting
- Once fruiting, pruning to maintain a balance between growth and fruiting.As suppliers of young fruit trees we are most interested in customers getting the first stage correct – developing the shape of the tree by building a framework of branches for the future.
Below we deal with the early development of Bush trees, Espaliers & Cordons
Bush Trees
 In this case we are pruning to develop a bush tree – a tree of a goblet shape above a clear stem. The length of clear stem greatly depends on the rootstock vigour – dwarfer rootstocked trees will only support a short clear stem whereas a variety on a vigorous rootstock will support a long clear stem.
The below heights of clear stem should serve as a guide:
- Dwarf bush – 0.6m / 24″ (Apples on M9)
- Bush – 0.75m / 30″ (Apples on M26, Pears on Quince C & Cherries on Gisela 5)
- Tall bush – 1m / 36-42″ (Apples on M26 (maximum), MM106, Pears on Quince A, Cherries on Gisela 5 & Plums on Pixy)
- Half standard – 1.35m / 4’6″ (Plums on St Julien A. Maximum for Apples on MM106 & Pears on Quince A)
- Standard – 1.8m / 6′ (suitable for apples on M25, Perry Pears on Wild Pear, Cherries on Wild Cherry F12.1 & Plums on Brompton)
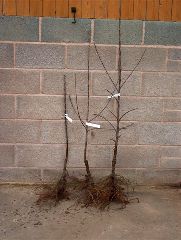 The ‘maiden’ trees supplied will either be:
- Feathered – with many branches up the main stem occasionally
- Feathered – a few scattered branches
- Unfeathered – without branches
Whether a variety is feathered or unfeathered is explained when ‘Larger image’ for the variety in the Catalogue is clicked.
Pruning – winter of planting
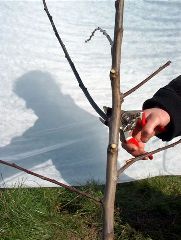 Assuming the tree has reached the required height reduce it to just above the required clear stem height cutting to just above a bud. This will be job done for now on unfeathered varieties ie Apple Blenheim Orange
On trees with occasional feathering remove any lower side branches – they are often in the wrong place or if left would make an unbalanced tree. Very low side branches should be totally removed but where being removed higher up the stem near the top leave a short stub (photo). From behind this stub growth will arise.
 Where a tree has plenty of feathering ie Apples Ellisons Orange, Adams Pearmain you may be able to make use of the branching. If a nice selection of branches are arising around the clockface about the height you wish to cut back to then select 3or 4 well placed branches. Cut back the main stem to just above the highest of the selected branches. Remove the unwanted, usually lower branches and reduce the length of the feathers by 2/3. If you are able to do this on a tree it will be one year ahead of an unfeathered / occasionally feathered tree.
If the tree has not made the required height, which will be the case if you are growing standards and may be the case if you wish to grow half standards, leave the central leader to grow on and remove all side branches. Continue to maintain a clear stem until it has reached above the height you wish branching to start.
The tallest trees we have been supplying are the plums. Many trees have been 2-3 m tall and we have had to reduce them to deliver. Even if they have been reduced already reduce them further to 1m – 1.35m. One of the main reasons for reducing a trees height is to ensure future picking of fruit is lower and easier.
Do not expect your newly planted tree(s) to put on lots of extension growth over the summer – they have had quite a shock in being lifted and transplanted.
Pruning times
The above pruning process applies to all fruit trees. However the timings vary. Apples and Pears can be pruned any time during the winter once they have become dormant. Prune Plums early spring and summer to guard againest silverleaf disease. Cherries should be pruned early spring at bud burst to prevent bacterial canker.
Pruning – second winter
Assuming your tree(s) have grown well they will need pruning again to continue to develop a framework. Choose the best three or four evenly spaced branches, ideally with wide angles to the main stem. wide angles mean stronger branches. Reduce these by 2/3 to half depending on their growth to an outward facing bud and remove the unwanted branches flush with the main stem.
Pruning – third winter
During the summer a number of laterals, often two, will be produced from the primary branches. In the third winter reduce them and extension growth on the primary branch by up to half. Cut all branches not required as secondary branches back to four or five buds.
From now on the tree should be bearing fruit and pruning becomes lighter. Remove any growth crowding the centre of the tree where poor quality fruit will be produced.
Restricted trees
These include cordons, espaliers & step overs. They will require summer pruning. This restricts their growth and encourages fruit bud formation for the following spring. Summer pruning is done from late July in the south to late August in the north as growth is reducing.
Cordons
For small gardens, cordons are ideal for growing apples & pears against walls and fences taking up little space. Each tree becomes a trunk with short side branches on which fruit forms.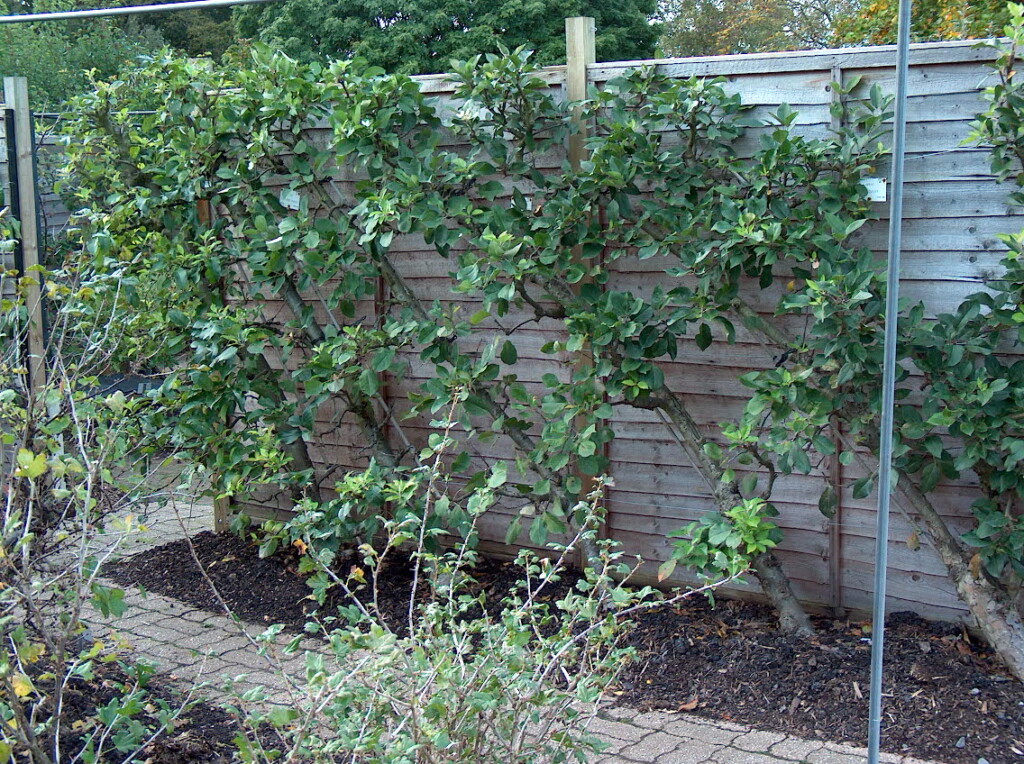
Cordons can be grown vertically, over an arch for example or an an angle which checks the vigour of the tree & encourages fruiting. Apple varieties on semi dwarfing M26 or if more space available MM106.
Planting
Attach lines of wire 30cm apart starting at 60cm above the soil to the wall or fence. If growing at an angle plant ‘maiden’ trees at 45 degrees with the graft union uppermost about 90cm (3ft) apart, about 15cm away from the fixed structure to allow for growth, tying them to long canes attached to the horizontal wires.
Year 1 training – before growth
After planting and before growth reduce any side branches to three or four buds. Reduce the unbranched leader by up to 50%, this will encourage side shoots.
Year 1 – summer pruning
Tie in the leader to the cane as it grows through the summer. From now on cordons are summer pruned from late July.
Reduce shoots/laterals that are a secateurs length or longer arising from the main stem back to three leaves, or one leaf if coming from existing branching. Leave immature or as yet short shoots to be pruned late September or October.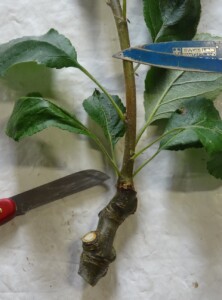
Year 2 training
If the main stem is unbranched for a good length above the side shoots reduce it back by up to 50% before growth to encourage branching all the way along the cordons length. Continue to tie this leader in as it grows until it reaches it ultimate length when it can be cut back to a leaf or a weak shoot.
Summer prune from late July cutting back to one bud above the basal cluster of leaves where the laterals have been pruned previously. The basal cluster is a rosette of leaves at the very base of the current seasons growth as shown in picture right where knife bottom left is pointing.
In subsequent years continue to summer prune. In time you may well need to thin out overcrowded fruiting systems that are becoming congested. Remove weaker bud and growths in the winter
Espaliers
Like cordons espaliers are ideal for growing apples & pears against walls and fences. They can also be developed to create a boundary within a garden. Plant ‘maiden’ trees, they are ideal for training.
More is involved than growing cordons. Develop one tier each year. Use varieties on M26 if two or three tiers required & MM106 for three or more tiers.
Planting
Plant 3.6-5m (12-15ft) apart if more than one is to be grown and about 15cm (6″) away from any fixed structure. In the winter of planting a horizontal support wire is attached to the wall or fence about 30cm (12″) above soil level. The tree is cut back to a bud 5cm above the support wire. If there are any side branches below this height cut back leaving a stub as in below photo.
 Though not usually the case if, when planting the ‘maiden’ tree, there are strong side shoots around the height of the wire retain two to start the first tier and remove any others. Reduce the retained side shoots to about 45cm & tie in horizontally. Cut back the main stem to about 45cm (18″) the side shoots – the height of the second tier. In the first summer treat the side branches and new shoots to form the second tier as explained below.
Year 1 training
 During the early summer a cluster of shoots will arise. In June some can be selected to create the first tier.
The shoot from the uppermost bud is usually the stongest & is allowed to continue vertically supported by a cane while the most appropriate shoots below are trained horizontally left & right to form the first tier of branches. Attach to the support wire together with a cane. Any other shoots that have developed are removed.
If growth of the horizontal shoots is slow or unequal raise as appropriate to 45 degrees & later bring down to the horizontal.
Year 2 training
Before growth put in place another horizontal support wire up to 45cm (18″) above the lower tier and prune the vertical shoot to a bud 5cm above it. Reduce the horizontal shoots of the first tier to about 50cm. The whole process is repeated in the second summer on the second tier. The first tier branching is tied in horizontally.
The process is repeated for as many years as the number of tiers required. When the horizontal tiers have reached their extremity cut back to a leaf or a weak shoot.
Summer pruning
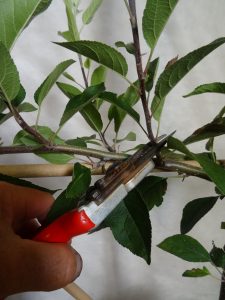 Shoots will develop along the tiers. These should be summer pruned like cordons from late July. Reduce to three buds branching arising directly from the horizontal tier that is a secateurs length or longer and one bud branching arising from existing shoots. This pruning encourages fruit bud formation overwinter. Leave immature or as yet short shoots to be pruned late September.
In the following summer prune from late July cutting back to one bud above the basal cluster of leaves where the laterals have been pruned previously. The basal cluster is a rosette of leaves at the very base of the current seasons growth.
In subsequent years continue to summer prune. In time you may well need to thin out overcrowded fruiting systems that are becoming congested. Remove weaker bud and growths in the winter
Step Overs
Step overs are just single tier espaliers and are grown in the same way but without the central upright shoot. They can edge a vegetable plot or be grown next to a path without hindering access or shading other plants. Select apple varieties on dwarfing M9 or semi dwarfing M26 rootstock at the most.
Download Our Free Leaflet
We produce a leaflet which accompanies any order and is downloadable here which details many aspects of planting and growing fruit trees.


